A friend of mine recently called and asked if I wanted some peaches they wouldn’t use before going out of town... I of course said yes! She brought over the better part of half a bushel. So I sat down made myself a cup of coffee and got to thinking what delicious things I’d make with these beauties.
Anytime you are working with fresh produce, you must taste the raw product. How ripe is it? How sweet is it? Tartness?

When we lived in KC, we were close enough to my in-laws to benefit from their extensive garden & orchard. One year during that time, they had an exceedingly large peach crop. So I made lots of different things that summer. One thing I made was a peach based barbecue sauce. I used someone else’s recipe. It was good, but too heavy on the molasses flavor. This time around I decided to make my own based on our likes and preferences.
I started by chopping a whole sweet onion. I browned it in the pan dry, no oil or butter. Next add peeled chopped peaches. I used 6-7 medium sized peaches. The peaches we had were the perfect mix of sweet & tart. I also added 3-4 cloves of garlic (paste) and 1 tablespoon of tomato paste.


Now time for spices. Salt (1/2 tsp), pepper (1/4 tsp), smoked paprika (1/4 tsp), red pepper flakes (1 shake) & brown sugar(1/4 cup). All of these measurements are according to taste and the sweetness of the fruit....Please, Please Please taste as you go!

I used an immersion blender to make it smooth. A regular blender or food processor will work as well. Mine came out a little thick, so I added water to make it a more favorable consistency.
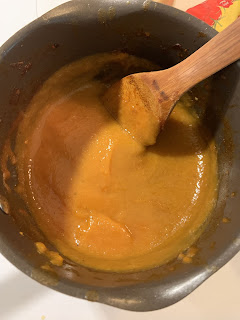 Taste as you go. The species on this are truly dependent on the sweetness of the peaches. I stored mine in mason jars in the fridge. I didn't "properly can" it because I didn't really make enough to warrant that. If you think you won't use it up right away, it will store nicely in the freezer.
I recommend this type of sauce with shrimp or chicken.
Anytime you are working with fresh produce, you must taste the raw product. How ripe is it? How sweet is it? Tartness?

When we lived in KC, we were close enough to my in-laws to benefit from their extensive garden & orchard. One year during that time, they had an exceedingly large peach crop. So I made lots of different things that summer. One thing I made was a peach based barbecue sauce. I used someone else’s recipe. It was good, but too heavy on the molasses flavor. This time around I decided to make my own based on our likes and preferences.
I started by chopping a whole sweet onion. I browned it in the pan dry, no oil or butter. Next add peeled chopped peaches. I used 6-7 medium sized peaches. The peaches we had were the perfect mix of sweet & tart. I also added 3-4 cloves of garlic (paste) and 1 tablespoon of tomato paste.


Now time for spices. Salt (1/2 tsp), pepper (1/4 tsp), smoked paprika (1/4 tsp), red pepper flakes (1 shake) & brown sugar(1/4 cup). All of these measurements are according to taste and the sweetness of the fruit....Please, Please Please taste as you go!

I used an immersion blender to make it smooth. A regular blender or food processor will work as well. Mine came out a little thick, so I added water to make it a more favorable consistency.

I recommend this type of sauce with shrimp or chicken.
Comments
Post a Comment